Just like there more than one way to skin a cat, there are few ways you could make a transparent background in Paint. In this guide, we will explain how to do it in regular paint, Paint3D, and Paint.Net
Table of Contents
Simplicity Behind Paint Software
 MS paint may be among the lesser-used programs in Windows, but the love for it is still alive. Microsoft in mid-2017 had announced the removal of this software from the future versions of Windows, thus relegating it to the world of deprecated features.
Much of the joy of using the program lies in its simplicity. But don’t judge it too soon because as simple as it seems, the more useful can it easily become. A majority of users overlook MS Paint for editing photographs as it offers relatively limited features and tools compared to those of Photoshop. However, one thing that you can easily do is removing the background of an image.
Removing the background of an image in MS Paint for Windows 10 is as simple as spray-painting a moustache on the picture of that irritating class bully. Here we will discuss how you can do the same.
How to Remove The Background in Paint
There are generally two methods that you can use to remove a picture’s background in Paint for Windows 10.
- Cutting out the foreground area of the image so the rest of its part becomes transparent, and then using the selected part or the foreground on an other image.
- Deleting the part that you don’t need and filling the empty area with a second background layer.
Though, you can always add transparent backgrounds to selected foregrounds, the transparent backgrounds won’t get saved of you are thinking of combining it with layers later on, that won’t work. However, you can use image layers to set them up with transparent backgrounds.
Step-By-Step Guide
- Select the image that you want to edit. Open it in Paint or Paint 3D using File>Open command.
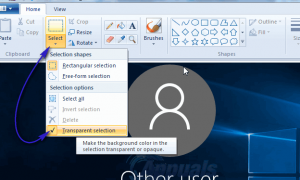
- From the home toolbar click on the Select tool. When the drop-down appears, click on Free-Form Selection.
- Trace around the part that you want to keep, using the cursor by holding the left mouse button while keeping the line as close as possible to the edges of the element. The rest part of the image outside the traced part is called a transparent background.
- A rectangular selection will appear around the selected area, when the selection will form a closed loop. Right click on the same. Select Cut from the drop-down menu to remove the selected part from the picture.
- You can also go to the selection tool in the toolbar and click on Invert Selection. This will instantly select the image background. Now, without changing the tools, click on it and drag it until the background is out of the picture.
- Now this selected foreground can be used in conjunction with some other image.
How To Remove Background in Paint 3D
- If you have also moved past the old school things into the three-dimensional era, and are worrying how to crop the image background, here is what you can do.
- Paint 3D is the successor to the original MS Paint and uses AI tools to make the selection process easier and more precise. Here’s how you can use these tools to remove the background in Paint 3D for Windows 10.
- Open the image you want to edit. Choose the Magic Select tool and trace around the sides of the area you want to work with.
- Adjust the corners of the image selection to remove or include the parts of the image. Paint 3D selects the foreground or the subject automatically. If you feel the need to fine tune your selection, use the Add and Remove buttons.
- Click on Done, once you have selected the part you wanted to edit. Right-click and copy the selected part so you can use it later with another image.
This will render the background of the image transparent.
Making the white background transparent
As soon as you obtain the final image in a white background, you can make the background transparent, so only the foreground is visible to you. To do this you need to follow some simple steps as mentioned below.
Click on the Canvas option at the top and enable the toggle button for Transparent Canvas present on the right side. To do this, right-click on the image and select canvas options. Then enable Transparent Canvas.
Once you follow these commands, the white background will disappear and your image will become transparent already. However, this doesn’t mark the end of the process, there’s one last step to follow which is crucial as well.
Saving the transparent image
With the background removed already, it is time that you save the selected foreground image by following the below steps.
- Click on Menu and select Save as, keeping the format as Image only.
- Before you proceed, Make sure the drop-down box under Save as type is showing PNG. If it’s some other format, change it to PNG. Secondly, check for the Transparency of the image in the transparency box.
- It is important that you save in PNG format. If you save it in some other format like JPG or JPEG, the image transparency will be lost and you will need to make the changes once again.
- If you forget to make the image background transparent using Canvas options, you must check the box adjacent to Transparency, when saving the image.
- Now, click on the Save button. Assign a name and select a save location to the new selected image.
Your new image/ foreground with a transparent background is ready to be used now.
A simple way to change the background
We describe how to change the background in Paint by the method of green screening (that is, the method of “green screen”). Regardless of whether you want to remove the background image or replace it with a solid fill (pattern), you can do this using the above method. Note that it describes the background change not in standard Paint, but in Paint.NET, which is not supplied with standard applications, and it needs to be downloaded and installed separately.
Beginning of work
Before you change the transparent background in the Paint Windows 7 program, you should open the image that you will adjust. This is done by pressing the right key on the file and selecting the corresponding item in the drop-down menu (Open with – Paint).
It should be borne in mind that BMP, JPFG, and GIF are among the compatible formats, it will not work with others. If the image exceeds the screen size, go to the lower left corner and make an 800 percent increase by clicking on the magnifying glass placed on the toolbar and selecting the number 8.
1.Choosing a color palette and drawing the outline of the image
On the color palette, you should choose yellow-green (also called lime) color. Usually, it is his choice, since a color contrasting with the rest of the pattern is necessary, and the chosen tone is quite rare in images.
After that, with the help of the “Line” tool, the object is selected, which will be cut. If you place the image on a white background. You can use the “Pencil” to fill in the missing pixels. Thanks to this a wide line of green color will appear around the picture.
Next, you need to click on the lime color with the right mouse button and, using the “Select” tool, outline the background areas of the rectangular color. Do this carefully, trying not to go to the object. You don’t have to worry about the extra triangles that remain around the contour of the drawing, and they are removed later with the Eraser tool.
By activating it, you must select the smallest of the possible squares in the menu that appears. After all the manipulations, we get an object, around which there will be a green screen. If you are interested in how to change the background in Paint, then you need to zoom out the image to 100 percent (1 in the approximation menu) and click on the paint bucket on the panel (Color Fill tool). Then select the desired color in the palette and click anywhere on the green background. After that, the background will be different.
2.Moving an image to a new background
To move the image to a different background, you need to select the white color in the palette and color the whole lime background using the Fill tool.
After that, Press the key combination “Ctrl + A” – and the second (lower) button it will activate on the pop-up toolbar.
After making sure that the new background has opened in another program window, you need to copy the image (Ctrl + C key combination) and paste it into this second window (Ctrl + V key combination). Work is ready! It remains only to keep it.
Please note that image quality is important when setting a new background. If the image pixel per inch or image size is too low quality, this will make the background blurry.
3.Few nuances
When editing detailed images, it will be much easier to work if you bring the image closer. This can be done by selecting the “Scale” sub-item in the “View” menu or simply by pressing the “Zoom” button located on the ribbon.
Note that larger image sizes will take more time to stroke. To reduce the size of the image, press “Ctrl + A” and drag the marker at the bottom left. It is important to observe the proportions so that the image does not turn out distorted.
In work, errors will inevitably arise, and therefore it is necessary to carry out line editing. To be able to undo previous actions quickly, we recommend it to keep your fingers on the key combination “Ctrl + Z.”
If the image has a border in the form of a curve, it is advisable to use the “Curve” tool. To do this, click the corresponding key on the toolbar.
Draw a straight line from the beginning to the end of the border which then needs to be pulled to the left or right, describing the curve.
In order for the greenspring method to work, in Windows 7 Paint you must set a transparent background in the settings for the inserts.
If you do not set this setting, it will add the background from the original image. The insert settings control panel will appear on the left side of the edited image, below the main panel when using one of the selection tools.
4.Background removal

If there is a need to transfer any object to another background, then inevitably we have to deal with the question of how to remove the background in Paint.
You can do this:
- using the Magic Wand tool, it selects the background;
- It deletes the selected part using the Delete button or the “Clear Selected” command from the Edit menu, because of which a background appears in the form of a “chessboard,” conventionally showing transparency;
- the resulting image is saved (preferably in PNG or GIF format ), which can later be used at your discretion.
How To Make a Transparent Background in Paint
- Step one. In the “File” menu, select “Open” and, by clicking “Browse,” open the desired image.
- Step two. Before you make a transparent background in Paint, in the toolbar, select the Magic Wand and set its sensitivity to 50 percent. With complex backgrounds, you should set sensitivity at 25-40 percent.
- Step three. It is necessary to click the “Magic Wand” on a white background, which then turns into a pale blue.
- Step Four. It is necessary to delete the background selected in this way by pressing the Delete key on the keyboard or through the Edit menu – the item “Clear selection.”
- As a result, the background will become transparent, although in Paint it will have a checkerboard color. However, this work on how to make a transparent background in Paint does not end there.
- Step five. After all the above manipulations, some areas in the picture will remain white. To make them transparent, you need to repeat the previous steps for them.
- Step Six. The resulting image with a transparent background must be saved by selecting the “Save” item in the “File” menu and specifying the file name, and selecting the required format (PNG or GIF) in the drop-down list.
No Need For Photoshop
We looked at how to make a transparent background in Paint if there is no Photoshop on hand. Despite the apparent complexity, even inexperienced users can handle it. With due attention and accuracy, the result will not be inferior to the work done in Photoshop.