 While using Google Chrome a person may come across various kinds of errors.
Out of those errors, some are annoying and eventually hampers the smooth performance of your computer.
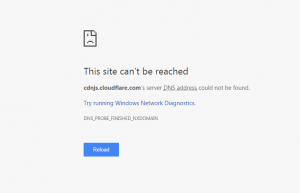
One such error is the “DNS Address Could Not Be Found” error.
In this article, we will talk about “DNS Address Could Not Be Found” error which is one of the most common errors that a user can face while working on Google Chrome.
Therefore, in the future, if you come across “DNS Address Could Not Be Found” error don’t panic as there are several solutions to overcome this error.
So, here we will review five genuine methods which will definitely help you to get rid of this problem.
Table of Contents
Main causes of “DNS Address Could Not Be Found” error
 In this section we will inform you about the main causes of “DNS Address Could Not Be Found” error.
Therefore, go through this section and stay updated about this error so that you don’t have to face it in the future.
You will notice that this error message mainly pops up while you are browsing through the internet.
“DNS Address Could Not Be Found” error is a very common error which occurs when the Domain Name server is unavailable.
A question might strike in your mind that why the domain name server is unavailable.
Actually, when you open any website in the background, your browser first contacts the DNS server, and if somehow your browser cannot contact the DNS server, then this error message pops up.
However, other than inaccessible DNS server, this error may also appear because of an unresponsive domain or even when your IP address change at the server level.
Now we will move into the next segment of this article as we have already discussed about the main causes of “DNS Address Could Not Be Found” error.
Most effective solutions to overcome “DNS Address Could Not Be Found” error
If you search on the internet, you will find that there are several methods to solve this error, but in this section.
We will mention about the five most common solutions that will surely solve this issue and moreover all the methods which will be discussed in this section are very easy to execute.
Therefore, thoroughly go through the solutions given below.
Solution One:
Configure the DNS settings using the Internet Protocol Version 4 (TCP /IPv4) option present at the Network and Sharing Center.
Solution Two:
Clear the DNS Cache with the help of Clear-Host Cache button.
Solution Three:
Reset TCP/IP by entering a few commands within the Command Prompt.
Solution Four:
You can even overcome this error by restarting the DNS Client Service.
Solution Five:
You can eliminate the “DNS Address Could Not Be Found” error by deleting all the files present in the “etc” folder.
Note: You will be able to access the “etc” folder by browsing into the following path “C:\Windows\System32\drivers\etc.”
Therefore, these are the most obvious methods to overcome the “DNS Address Could Not Be Found” error.
Now we will move into the next segment of this article where we will give a step-by-step analysis of the two most common solutions from the ones which are mentioned in this section.
Step-By-Step analysis to configure the DNS settings using the Internet Protocol Version 4 (TCP /IPv4) option
Most of the time “DNS Address Could Not Be Found” error occurs because of incorrect DNS settings so here we will guide you to configure the DNS settings properly so that you don’t come across this error in the future.
- First and foremost, press the “Windows key” on your Keyboard and then type “Run” within the search box.
- As you gain access to the “Run” option, type the command “ncpa.cpl” and press the “Enter” key on the keyboard.
- After pressing the “Enter” button you will be directed to the “Network Connections” window. As you enter the “Network connections” window, right-click on the “Wi-Fi” option which is shown in the picture below, and finally select the “Properties” option.
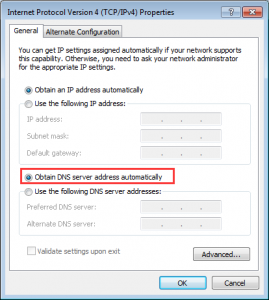
- After executing the previous step successfully, the “Wi-Fi properties” window will pop-up from where you have to select “Internet Protocol Version 4 (TCP /IPv4)” option.
- After selecting the “Internet Protocol Version 4 (TCP /IPv4)” option, click on the “Properties” button which is present just beside the “Uninstall” button.
As soon as you click on the “Properties” button, you will be redirected to the “Internet Protocol Version 4 (TCP /IPv4) properties” window from where you need to select “Obtain DNS server address automatically” option, and then just click on the “OK” button.
However, if the “Obtain DNS server address automatically” option is already selected then you need to select the “Use the following DNS server address instead” option.
If you have selected the “Use the following DNS server address” option, then you need to enter a few definite server addresses, and finally click on the “OK” button.
Note: The server addresses that you need to enter are as follows
Preferred DNS server: 8.8.8.8
Alternate DNS server: 8.8.4.4
Or
Preferred DNS server: 208.67.222.222
Alternate DNS server: 208.67.220.220
Or
So, after clicking on the “OK” button the entire process is completed, and hence you need to open Google Chrome and check whether the problem is solved or not.
Step-By-Step analysis to clear the DNS Cache with the help of Clear-Host Cache button in order to solve “DNS Address Could Not Be Found” error
Out of all the methods which are mentioned in this article this is the most straightforward and the most useful solution to overcome the “DNS Address Could Not Be Found” error.
As this is the most straightforward method so you can stay rest assured that you will be able to easily execute this method.
1. Firstly, open Google Chrome and visit the URL “chrome://net-internals/#dns.” Once you type the above-mentioned URL, you will be directed to a new window which is shown below.
2. As you enter the new window, you need to click on the “Clear-Host Cache” button which is present next to the Host resolver cache option.
So, as you will click on the “Clear-Host Cache” button the “DNS Address Could Not Be Found” error will be solved and eventually you will notice that all the websites will work properly.
Conclusion
As promised at the beginning of this article we have given detailed information about “DNS Address Could Not Be Found” error.
We have highlighted all the possible solutions to overcome this error and moreover we have also given a step-by-step analysis of the two most common solutions.
Therefore, in future, if anyone comes across “DNS Address Could Not Be Found” error just go through this article and execute the steps as mentioned here to overcome this annoying error.