 For a successful confrontation, the enemy must know him by sight.
To protect your virtual server from DDoS attacks, let’s first understand what the threat is.
Why it is dangerous for us and why it is so important to fight it.
Table of Contents
How To Stop ddos Attacks On Game Servers
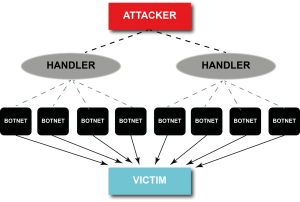
What is DDoS and how is it dangerous
DoS (Denial of Service) is an attack on a system whose main purpose is to bring it to a state of failure. In other words:
the hacker creates such a load on the server that users are trying to gain access to the resources of the machine cannot do this.
DDoS (Distributed Denial of Service) – an attack on a system that comes from a large number of computers. Its goal is the same as that of DoS – to bring the system to failure in work.
The essence of DDoS is as follows: from each computer is sent such a number of packets with requests to the resource that processing and sending response packets takes the entire system resource.
As a result: the services that this system supports, “fall,” and customers lose the opportunity to log on to the server, access the site, etc.
The consequence of such an attack for the owner of the resource is, first of all, the shortfall in profits due to system downtime.
That is why it is important to take all possible preventive measures, and if the attackers have already reached you, respond as quickly as possible and repel the hackers.
Preventive DDoS Protection Measures
To increase the server’s resistance to DDoS attacks, you can use various tools, the main of which are:
- Apache setup;
- Installing and configuring Mod_security;
- Apache + nginx bundle configuration.
Below we look at each of them in detail.
Apache web server setup
To make the server more secure against DDoS attacks, you need to configure Apache configuration files located in the / usr / local / etc / httpd / conf directory (3 pcs.):
- httpd.conf
- srm.conf
- access.conf
Before editing them, make copies of the files. To do this, enter the command cp in the command line of the console and specify the full name of the file you want to copy, and after space – the name of the copy file.
For example:
cp /etc/httpd/conf/httpd.conf ~ / httpd.conf.backup
Not all versions of Apache have the same security settings, so an attacker’s getting information about the system’s version increases his chances of attacking the server.
To prevent system information from leaking, use the httpd.conf file.
To prohibit the display of server version data on a page when an error is displayed, disable the ServerSignature directive (select Off beside it).
Also, using the ServerTokens directive, you need to limit the amount of information that the server reports about itself when responding to an http request.
To do this, write “Prod” opposite the indicated directive. As a result, the server will only display the word “Apache” in the Server header instead of full information about its version.
Now we will set certain limits in httpd.conf:
- Timeout – a period of time during which the server waits for the continuation of a client’s missed request or tries to send a response. The default values (300 seconds) can be reduced to 100 seconds (in particular for VPS), which will reduce the impact of DDos attacks. It is important to take into account the speed of the Internet connection and the size of the packages that you plan to receive in order to maintain the normal operation of the services;
- KeepAliveTimeout — server timeout for the next client request within one connection. It is recommended to reduce the initial 15 seconds to 10 seconds (at medium load) or 5 seconds (at high load) of the server;
- Username and group. For the user name user and group, from which the server will be launched, specify “apache” – this way you will not compromise your mail server if hackers suddenly manage to bypass the protection;
- Directive Options. Using the Options directive, which is contained within the Directory tag, disable some options, in particular: SSI, launch CGI, FollowSymLinks. To do this, we write in front of them the following values:
- Options -Includes – disables SSI
- Options -ExecCGI – disables CGI
- Options -FollowSymLinks – forbids Apache to follow symbolic links
If you prescribe for Options “None,” then we disable them all. To disable individual options, write:
Options -ExecCGI -FollowSymLinks -Indexes
In access.conf (one of the 3 files mentioned earlier), the Directory tag, you can disable support for .htaccess files by setting the AllowOverride directive to None.
However, if you need the server to read such files, leave AllowOverride enabled by setting All in front of it (it allows you to use any .htaccess directives) or limit it:
- AuthConfig – access for permission directives
- FileInfo – allows you to use directives that control the types of documents
- Indexes – the ability to use directory indexing control directives
- Limit – allows only access control directives
- Options – only directives to manage specific features of the directory.
Directives such as LimitRequestFieldSize, as well as LimitRequestFields and LimitRequestLine, are in most cases set automatically at a level that is acceptable for most servers.
They are designed to limit the size of client requests, which also helps protect the server from DoS attacks. After reviewing the documentation .
You can customize them more carefully, thereby limiting resource consumption by customers.
Limit the size of downloadable files ( LimitRequestBody – the default is not limited) and XML requests ( LimitXMLRequestBody – the default is 1 MB) in the httpd.conf file, writing the desired value in bytes. For example, set the maximum file size to 1 MB, and XML requests from 1 to 10 MB (10485760 bytes).
Depending on the capacity of the RAM, you need to change the MaxClients settings.
Here you can specify the maximum number of client requests that the server will handle at the same time. Due to this, MaxClients can reduce or increase the load on the machine.
When choosing the optimal number for this parameter, consider how many clients can be on your site at the same time (if possible, analyze the visitor statistics) and make a small premium to avoid denying access to the site in the event of a surge in attendance.
Install and configure mod_security
Another way to protect the server from DDoS attacks is to install the mod_security module for Apache and configure the necessary filters in it.
To install the module use the following commands:
apt-get install libapache2-modsecurity – Ubuntu / Debian
yum install mod_security – CentOS,
Where:
- apt-get install and yum install are commands for installing programs for Ubuntu, Debian and CentOS systems, respectively;
- libapache2-modsecurity and mod_security is the name of the program that we install from the system storage.
To make sure that mod_security is loaded, on the command line we write:
apachectl -M | grep –color security
An indication that the download was successful is the message:
security2_module (shared)
After that, you need to complete the installation of the module, which involves renaming the configuration file:
mv /etc/modsecurity/modsecurity.conf{-recommended,}
Restart Apache for the changes we made to start working:
service apache2 reload
Now that everything is installed, you are ready to configure mod_security. Leaving the modsecurity.conf configuration file unchanged is not worth it since it is basically configured to only monitor the logs of requests without blocking the detected vulnerabilities.
To put mod_security in recognition and neutralization of vulnerabilities mode in modsecurity.conf edit line SecRuleEngine, namely the preset value for it “DetectionOnly” change to “On”:
It was:
SecRuleEngine DetectionOnly
It became:
SecRuleEngine On
Since the DDoS attack is directly related to the transfer of data, the next step will be to limit their possible volume.
In mod_security, SecRequestBodyLimit and SecRequestBodyNoFilesLimit directives are responsible for this .
The value of the basic registered configuration is 12.5 MB and 128 KB, respectively. They can be reduced, thereby limiting the maximum amount of data that can be sent to the server.
In this case, SecRequestBodyLimit already takes into account the volume of transferred download files, but SecRequestBodyNoFilesLimit does not.
You can adjust the maximum amount of the request body, placed in RAM. To do this, use the settings SecRequestBodyInMemoryLimit . The remaining data will go to Swap. To reduce the load on memory, this value (128 KB) can be reduced.
In addition to adjusting the modsecurity.conf directives, you must load the CRS (Core Rule Set) rules for filtering. To do this, edit the data in /etc/apache2/mods-enabled/mod-security.conf .
In the directory with the security2_module module, add directories with the rules that the Apache web server reads at startup:
<IfModule security2_module>
Include “/usr/share/modsecurity-crs/*.conf”
Include “/usr/share/modsecurity-crs/activated_rules/*.conf”
</ IfModule>
The rules for mod-security are in directories:
- / usr / share / modsecurity-crs / base_rules
- / usr / share / modsecurity-crs / optional_rules
- / usr / share / modsecurity-crs / experimental_rules
Now it is necessary to create symbolic links in the activated_rules directory to activate the rules we need.
Here we immediately set a rule to protect against SQL-code input, which prevents attackers from gaining access to MySQL databases through dummy login-password:
cd / usr / share / modsecurity-crs / activated_rules / ln -s /usr/share/modsecurity-crs/base_rules/modsecurity_crs_41_sql_injection_attacks.conf
To make your changes active, restart Apache.
If everything was done correctly and enabled SecRuleEngine, then when you try to bypass the firewall and get access to the SQL database, the system will generate the error “403 Forbidden”.
If, after the introduction of arbitrary SQL-code, you successfully entered, then DetectionOnly was not replaced by On for the SecRuleEngine parameter.
When setting up any of the above parameters that limit the size of the request or the amount of memory allocated for their processing.
Remember that you need to find a balance between the required server performance and its protection from DDoS attacks.
Install and configure Apache + nginx bundle
Another security option is to install the nginx proxy server in conjunction with Apache, which enhances the security of your system.
With such cooperation, nginx enhances (insures) Apache, taking away the processing of static content.
Nginx is installed in the console with the command:
- apt-get install nginx – for Debian / Ubuntu
- yum install nginx – for CentOS
Like Apache, it also has its own security settings available in /etc/nginx/nginx.conf. The most important parameters for us here are:
- client_max_body_size – limits the maximum size of the request body. It is usually set in the range from 1 to 24 MB;
- client_body_buffer_size – determines the size of the buffer for reading the request body from the client (from 16 KB);
- client_header_timeout – limits the transmission time of the full request header (usually set within 10-20 seconds);
- client_body_timeout — defines the time of the request body transmission (usually the same value is set as for the client_header_timeout parameter);
- keepalive_timeout – sets the duration of the client connection to the server (15-30 seconds);
- send_timeout – the time allotted to the client to accept the response (2-10 seconds).
Now you are familiar with the 3rd main ways that help protect the server from DDoS attacks. Unfortunately, no settings and filters can completely protect us from the problem.
Such methods are more likely a barrier that will allow us to mitigate the effects of the attack and gain time in order to understand how best to defend ourselves when an attack on a site or server has already begun.
How to protect against DDoS-attacks, if it is already underway
If the attacker still managed to circumvent the barriers created by us, it’s time to think about how to resist the attack being carried out on the server or site.
The first thing to do: analyze the logs and understand who and in which direction is leading the attack, determine the common type of traffic.
For these purposes, the tcpdump utility, which allows you to see which type of packets comes most often, as well as the host-name and IP address from which they were sent, is well suited.
The result of traffic analysis obtained using tcpdump can be written to a file for further study by adding the -w option (on the command line, tcpdump -w <filename>).
In addition, certain keys allow you to set filtering and information output parameters immediately:
- -n – replaces the hostname with an IP address;
- -nn – displays the port number, not the protocol it uses;
- -q – provides minimal information output (protocol name, packet route, port numbers, amount of transmitted data);
- -r <file> – reads traffic from a file previously recorded with the -w switch, for example, tcpdump -r dumpfile;
- -T <type> – interprets packets of a specific type;
- -tttt – displays the date and time;
- -v – shows detailed information about traffic: TTL, ID, length of the request header and data about it);
- -c <number> – instructs the tcpdump utility to shut down after receiving a specified number of packets.
When the IP addresses from which unwanted traffic comes are identified, they must be blocked. Utilities (firewalls) that can filter and restrict the receipt of unwanted packets are suitable for this: iptables, fail2ban, APF, ipfw.
To add a specific address and packet type to the iptables filter list, the transmission of which we want to restrict, use the command:
iptables -A INPUT -p tcp –dport 80 -s 95.153.67.144 -j DROP
Where:
- -A – says to add a rule
- INPUT – denotes all incoming packets (traffic that must be limited)
- -p <protocol> – indicates the protocol for which the added rule will be valid.
- –dport <port number> – the port to which traffic will go (only if we know this information in advance)
- -s <address> – indicates the source of sending packets (you can enter either an IP address or a network name or hostname)
- -j – tells the command to apply if the incoming packet meets all the conditions specified earlier.
When we only know the IP address from which malicious traffic comes, it is possible to block it completely:
iptables -A INPUT -s 95.153.67.144 -j DROP
Another equally popular and effective way to repel an attack is to configure the fail2ban utility.
In addition to free options for countering DDoS attacks, it doesn’t hurt and even is desirable to use paid protection systems like CloudFlare, Comodo, Cisco, Wanguard.