How to Fix ERR_TUNNEL_CONNECTION_FAILED | This webpage is not available
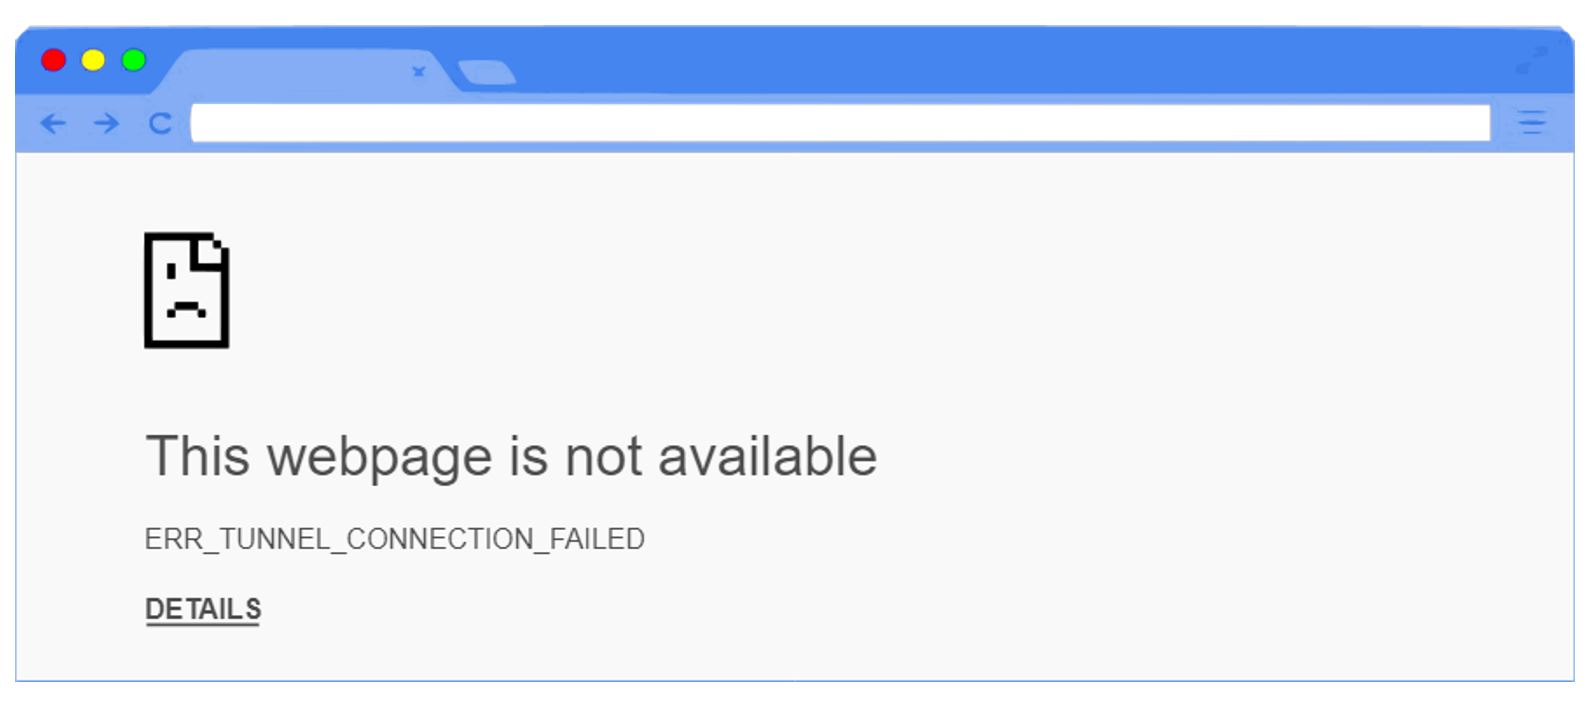
One of the common error messages that one gets on Google Chrome while surfing the web is how to fix ERR_TUNNEL_CONNECTION_FAILED This webpage is not available. Basically, the ERR_TUNNEL_CONNECTION_FAILED error is displayed when Google Chrome browser fails to connect to the internet or Google Chrome is not able to create a tunnel connection with the targeted website host.
You can solve the ERR_TUNNEL_CONNECTION_FAILED by disabling the proxy settings, flushing the DNS resolver case or changing the DNS address. Each of the following solutions will be walked through step by step below. However firstly, let’s discuss the reason behind this error so you can avoid it in the future.
Table of Contents
Why do I keep getting ‘ERR_TUNNEL_CONNECTION_FAILED This Webpage not Available’?
When the Google Chrome browser fails to connect to the internet or Google Chrome is not able to create a tunnel connection with the targeted website host, this creates the ERR_TUNNEL_CONNECTION_FAILED error. Another reason behind facing this Net Err_Tunnel_Connection_Failed error can be the usage of a proxy connection to access the internet. Sometimes there can be other reasons due to which you can see this error message on Google Chrome browser are Browsing Data and cookies those are saved in browser, website domain configuration are not set up correctly, browser data conflicting, issues of DNS connection, or proxy settings those are entered correctly. The list of the root cause for this error can be numerous. But the method to fix this error is quite simple.
How do I fix the ERR_TUNNEL_CONNECTION_FAILED error?
Fix 1. Disabling Proxy Setting
As the first step of resolution on Google Chrome try to check if some proxy settings are used on your computer. There are chances that you may face this error in Google Chrome due to some proxy settings. To fix this issue you have to change proxy settings on your computer, by following these steps:
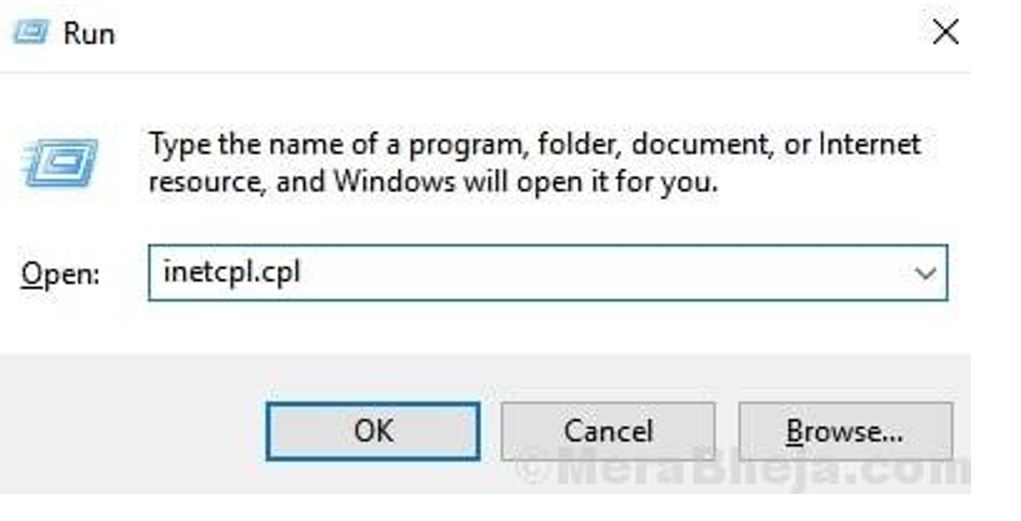
- Press Windows and R keys from the keyboard, and it will open the RUN command prompt.
- Type or copy and paste “inetcpl.cpl” in the RUN command prompt and hit Enter or click the OK button at the bottom of the prompt.
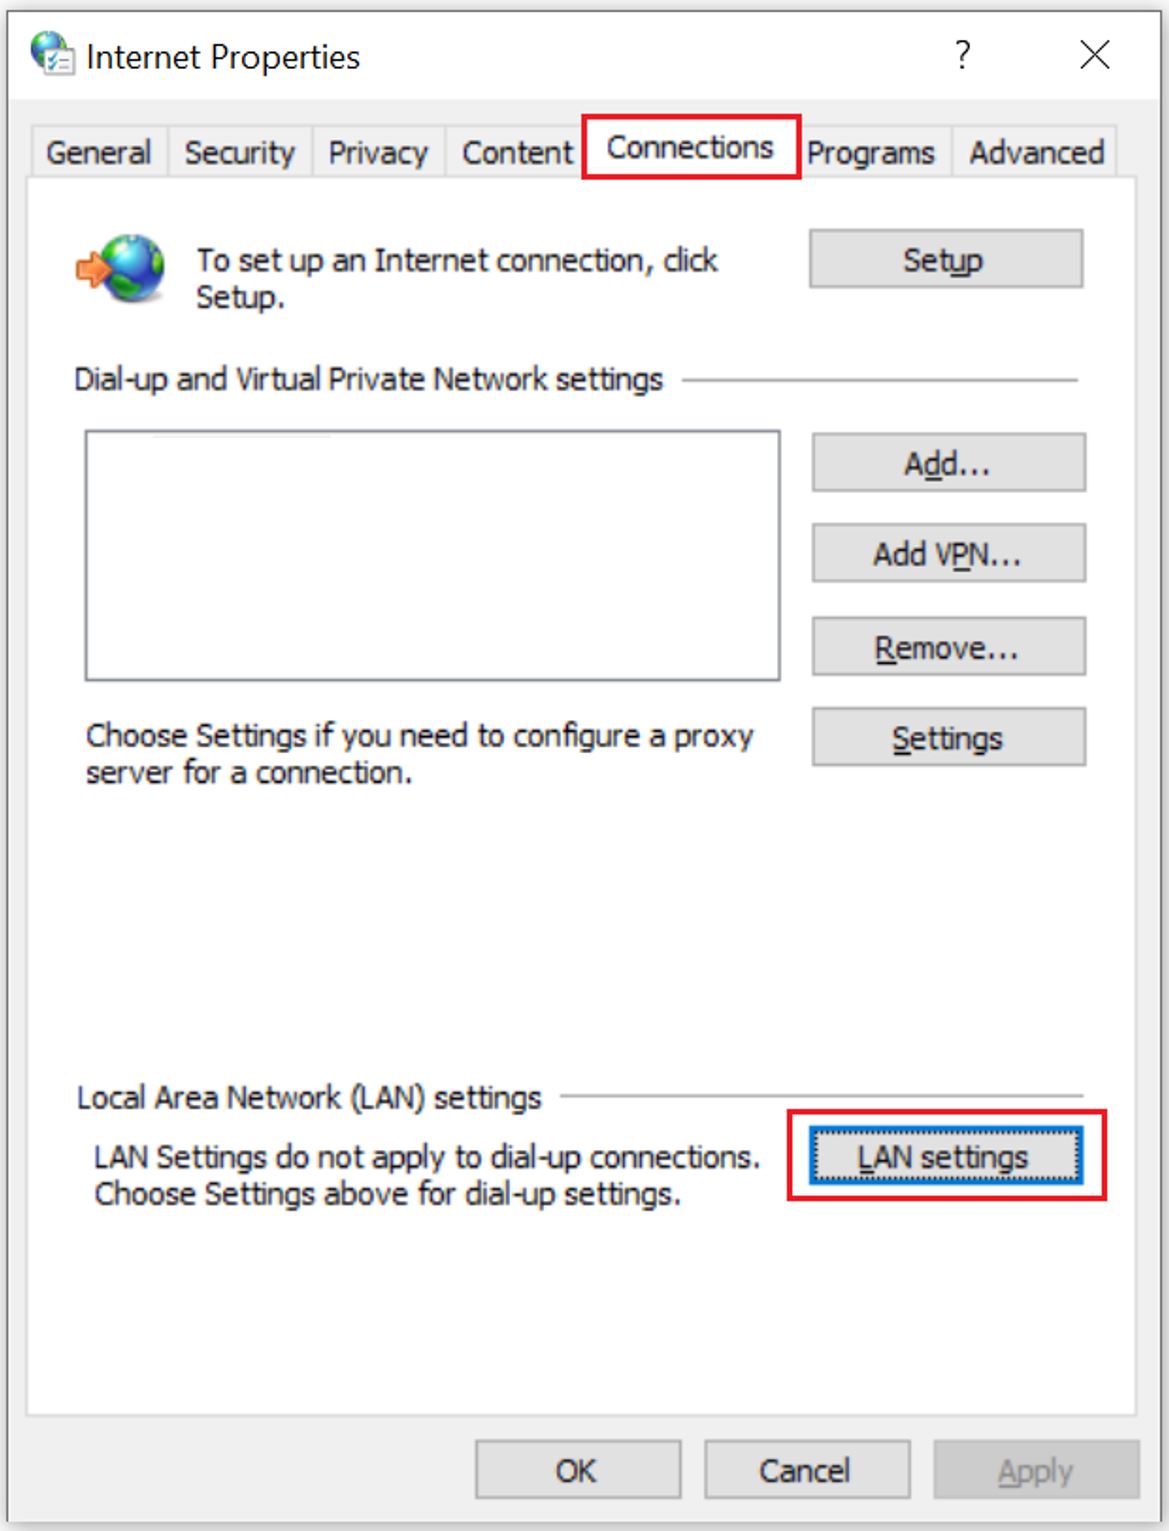
- On the Window of Internet Properties, select the “Connections” Tab.
- Under the “Connections” tab click on the option of “LAN Settings”.
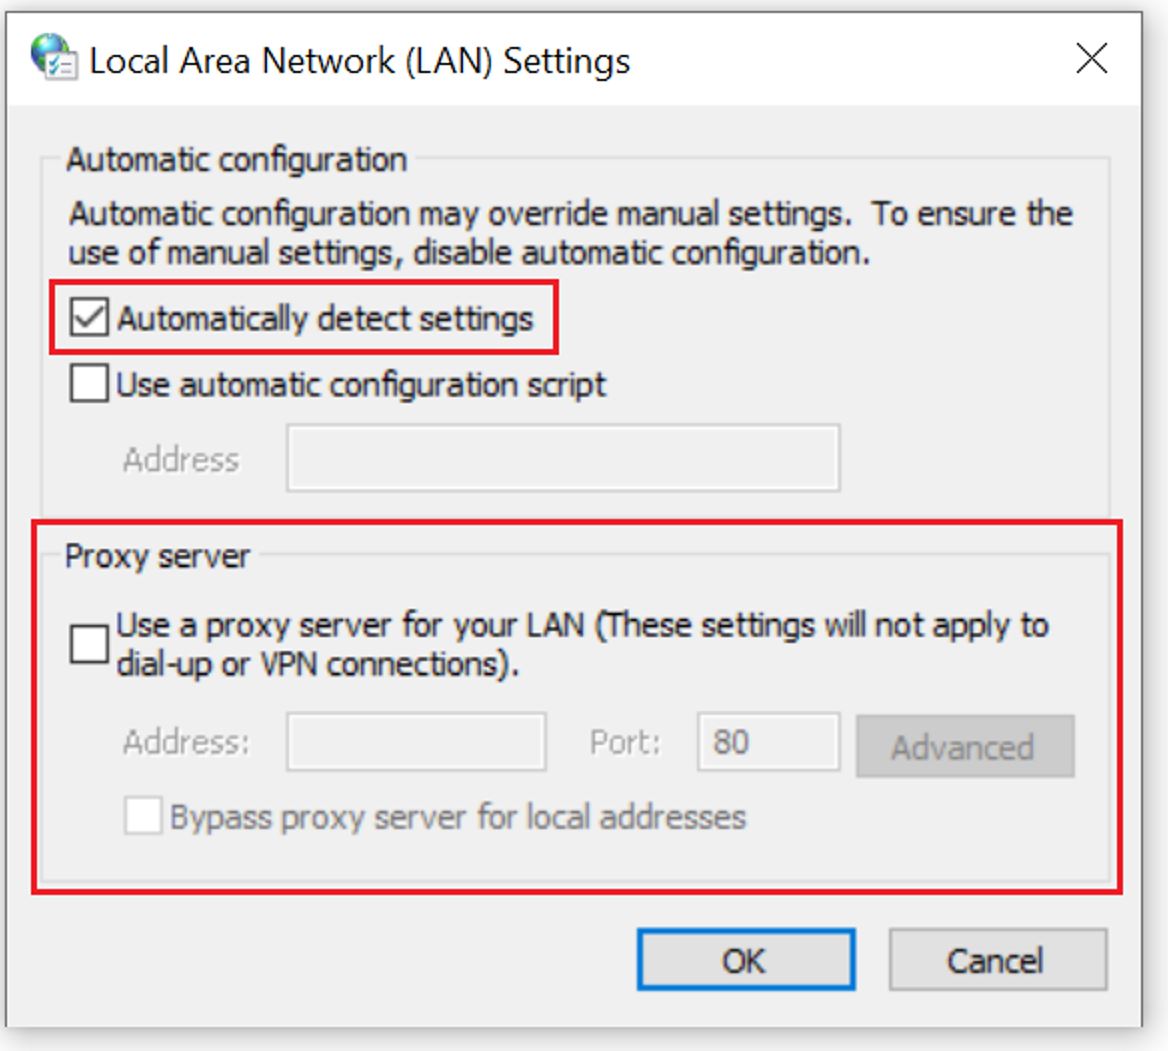
- Once you select LAN settings, a new window will open in front of you, and there deselect the checkmark off “Use a proxy server for your LAN” make sure that the “Automatically detect settings“ option is selected.
- Click on the OK button from the bottom of the window to apply the settings.
- Once done close all of the open windows and restart your computer.
- Once the computer is turned on try to open the Google Chrome browser and check if you are able to access the website without facing the ERR TUNNEL CONNECTION FAILED error.
Fix 2. Flush the DNS Resolver Cache
Another solution to this Net Err_Tunnel_Connection_Failed is by resetting your current Network settings. This will require you to reset your TCP/IP and also flush DNS. You can follow the below-mentioned steps to reset network settings:
- Go to the Windows Start menu by pressing the Windows button from your keyboard and type in CMD in the search bar. On the command prompt icon right-click and select the Run as Administrator option.
![]()
- Once Command Prompt opens up type the below mentioned commands one at a time:
- IPCONFIG /FLUSHDNS
- NBTSTAT –R
- NETSH INT IP RESET
- NETSH WINSOCK RESET
- After successful execution of these commands restart your system.
After the restart, open Google Chrome to ensure that the error Err_Tunnel_Connection_Failed is fixed or not.
Fix 3. Changing DNS Address
If the IPv4 DNS address on your computer is set to obtain the DNS server address automatically or it is set to the DNS address provided by your ISP (Internet Service Provider). If it is not set to any one of these, then it is a possibility that you are getting Err_Tunnel_Connection_Failed in Google Chrome.
If this is the case you can try setting the DNS address to Google server DNS address. To do so you can follow the steps mentioned below:
- Right-click on the Network icon from the taskbar and
- Select Network and Sharing Center option to open up the Network and Sharing Center Window.
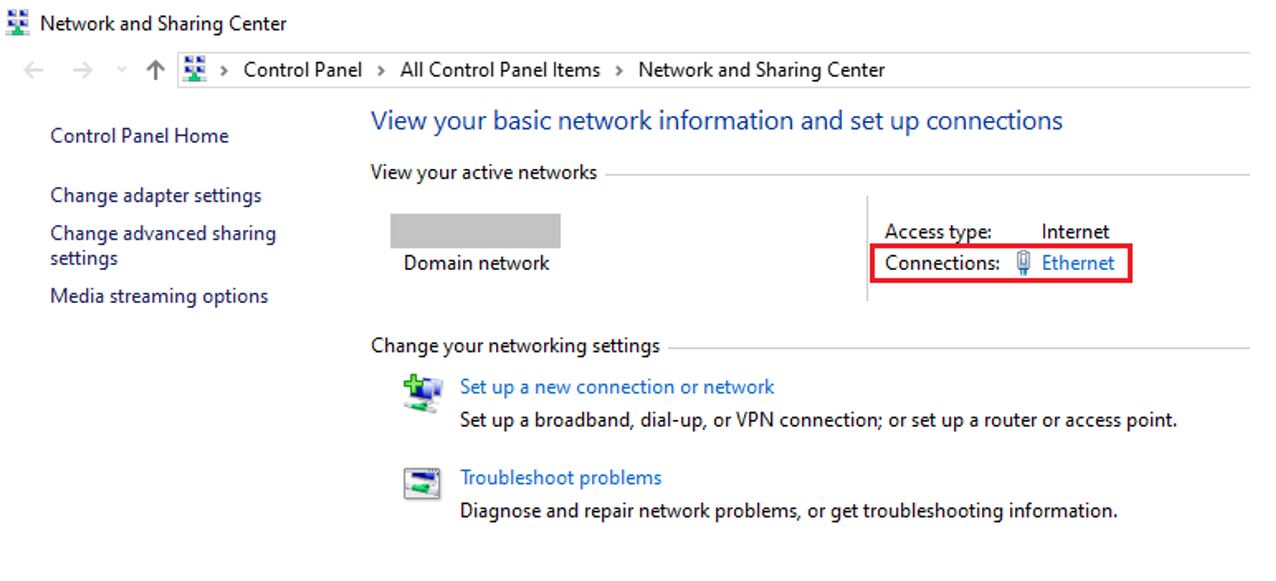
- On the Network and Sharing Center View your active networks section, and click on the network on which you are currently connected.
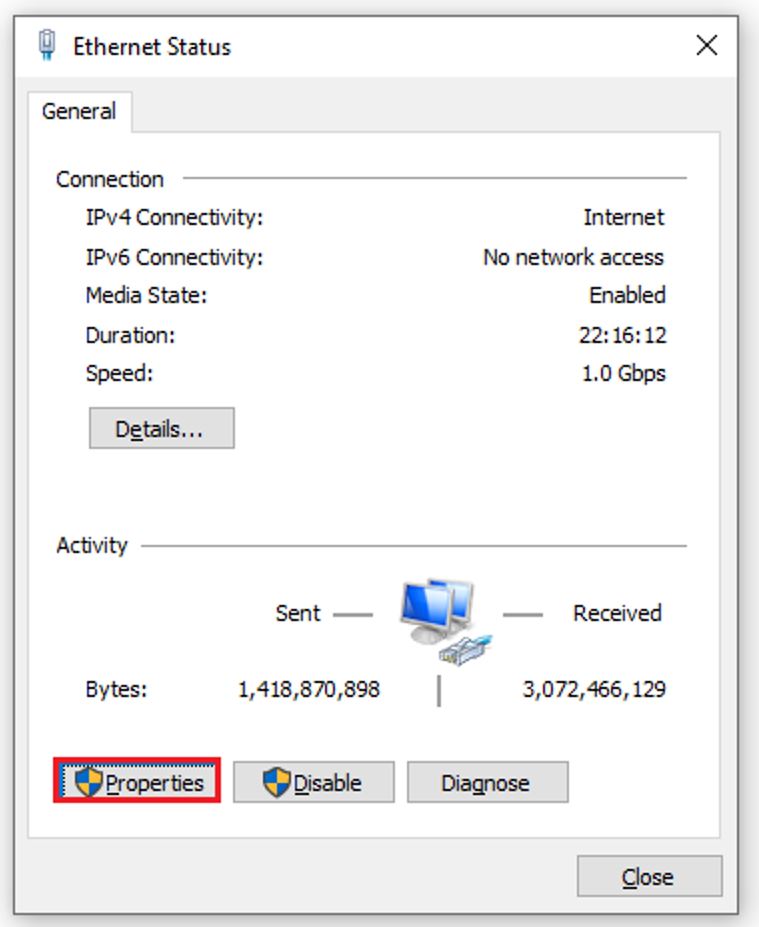
- In the Internet Connection Status window, click the Properties option.
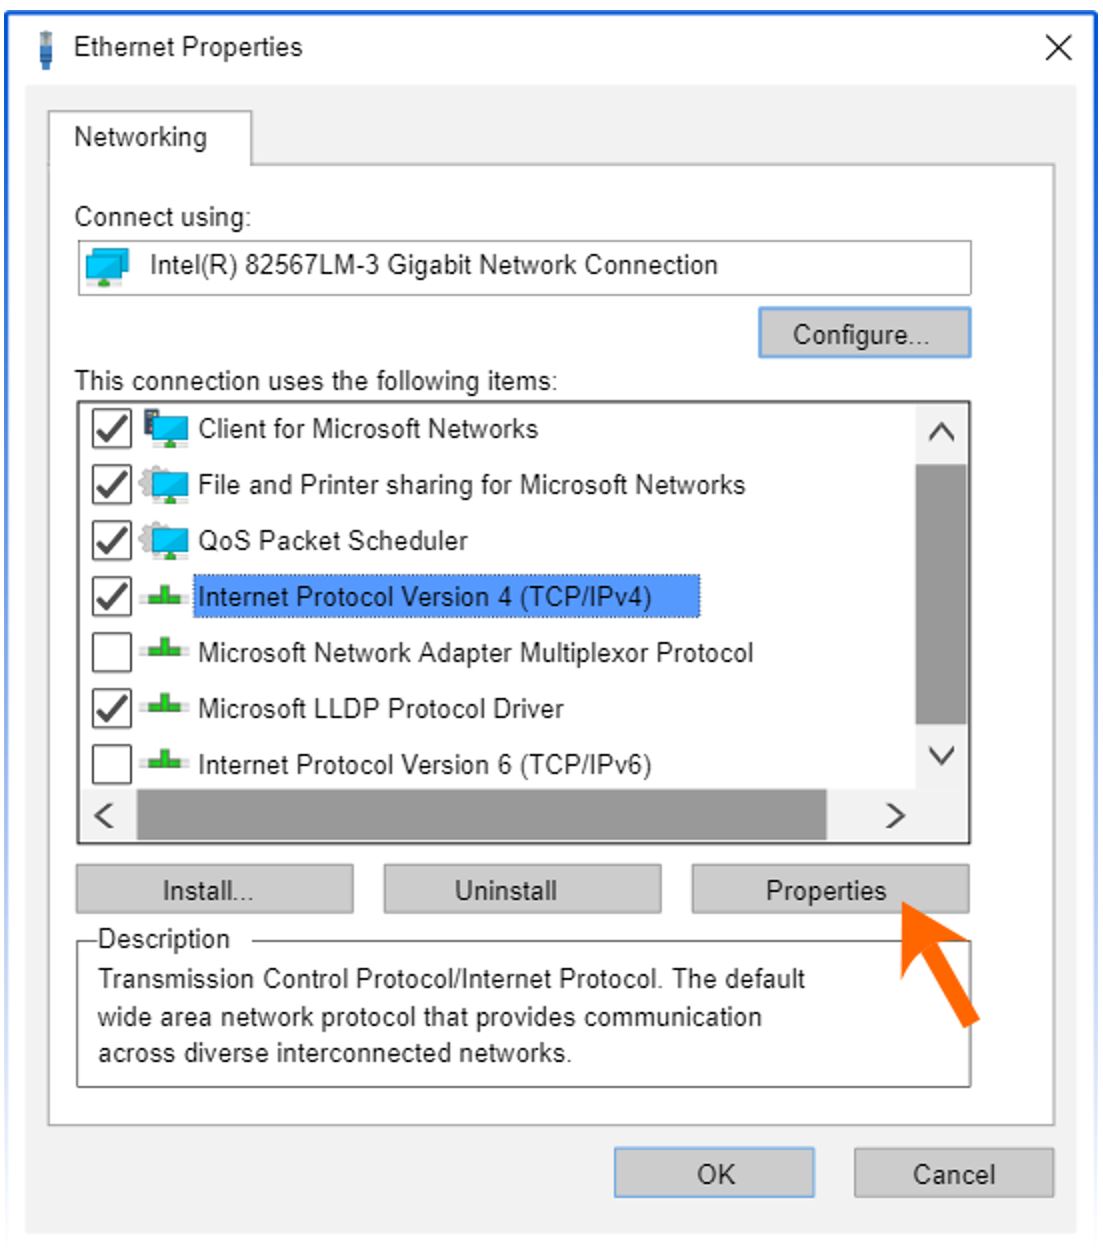
- In the next Window find the Internet Protocol Version 4 (TCP/IPv4) option from the list and double click on that.
- On the next Windows that have opened, you would be able to see whether DNS is set to obtain automatically or it is set to some other value. Enter manually the Google public DNS server address.
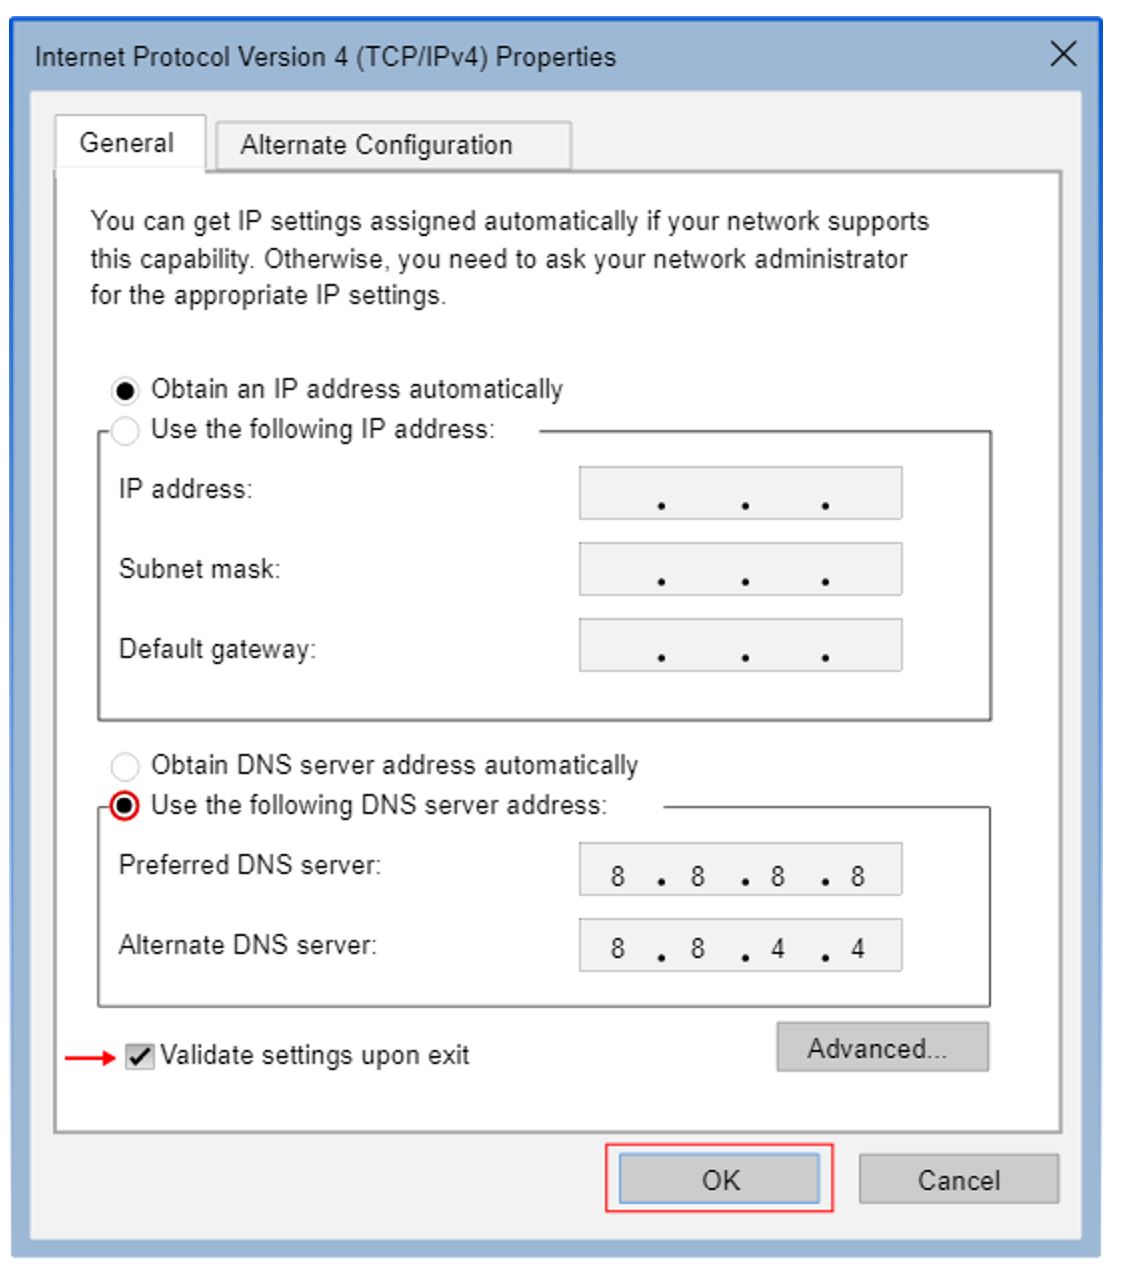
- Once the DNS address is set check the “Validate settings upon exit” option.
- Once done, click on the OK button to apply the DNS settings.
Restart the computer and open the Google Chrome browser to ensure whether the issue is solved or not.
Fix 4. Clear Browsing Data
Try to use another web browser to see if you are still receiving the Err_Tunnel_Connection_Failed error or if it is seen only on Google Chrome. If you are able to access the same web page or web site on any other web browser then Google Chrome is the culprit. It is possible that the stored browsing data is creating the issue. To fix the issue, go through the below-mentioned steps:
- In the Google Chrome URL bar type or copy-paste from here Chrome://settings and hit the Enter. This will open the Settings option of Google Chrome.
- One can also open Chrome’s menu by clicking on the three verticals dots at the top right-hand corner of the Google Chrome browser and from there select the Settings option.
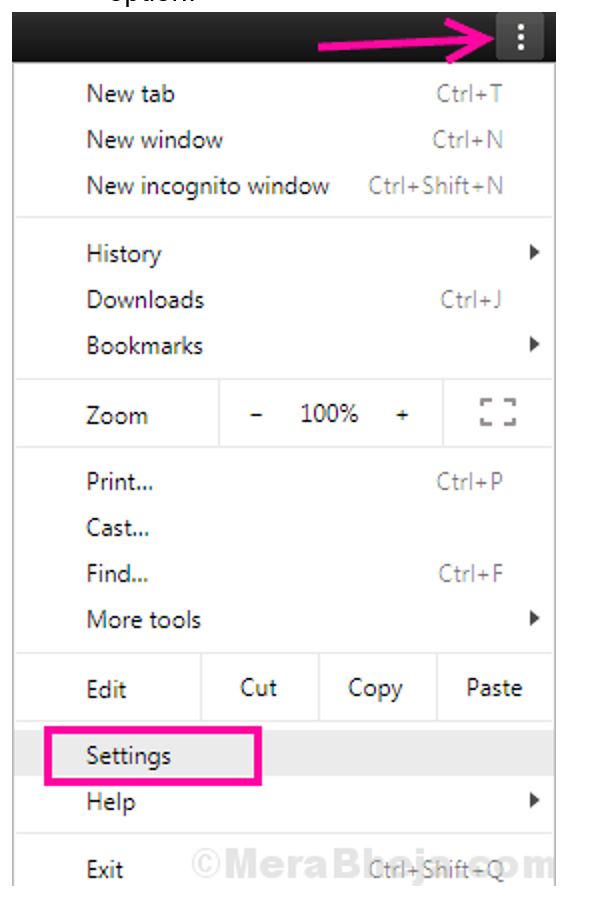
- Scroll down on the Settings page and click on the “Advanced” option.
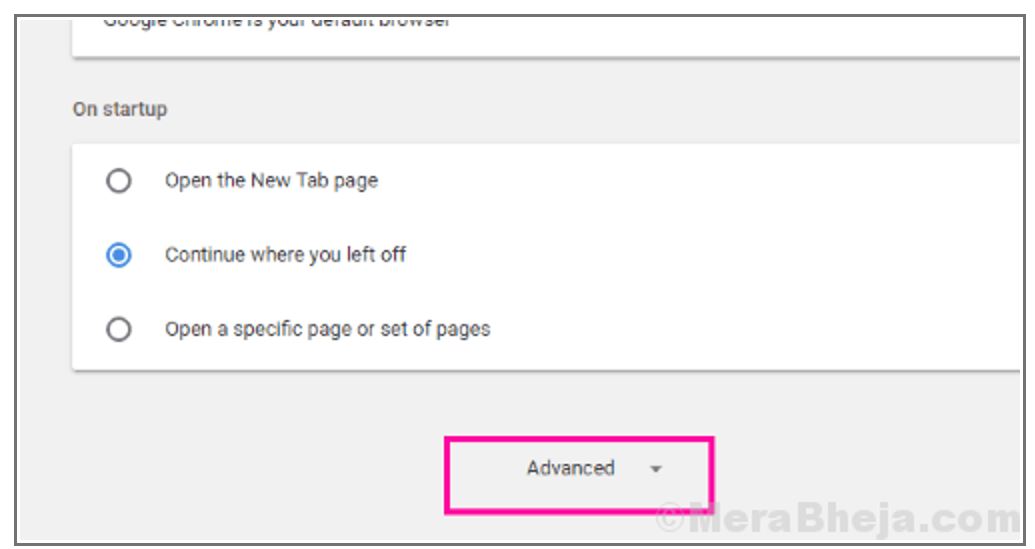
- After clicking the “Advanced” scroll down and select the “Privacy and Security” section, select and click the option of “Clear Browsing Data”.
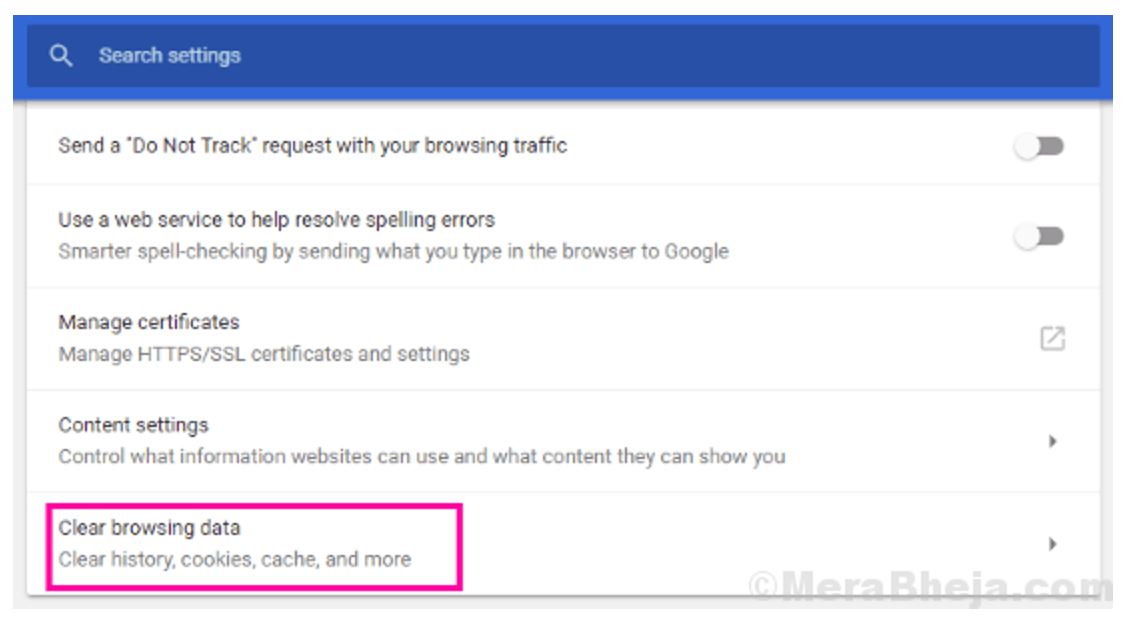
- This will pop up a new window. Check all items from the menu items and select the option All Time from the drop-down menu.
- Select the “Clear Data” button from the bottom of the page.

Wait for a while so that Google Chrome can clear all of the data. After that close, and restart your Google Chrome browser and try to surf the same website.
Fix 4. Reset Google Chrome Settings
Another option is to reset your Google Chrome browser. You can go through the below steps:
- In the Google Chrome URL bar type or copy-paste from here Chrome://settings and hit the Enter. This will open the Settings option of Google Chrome.
- Scroll down on the Settings page and click on the “Advanced” option.
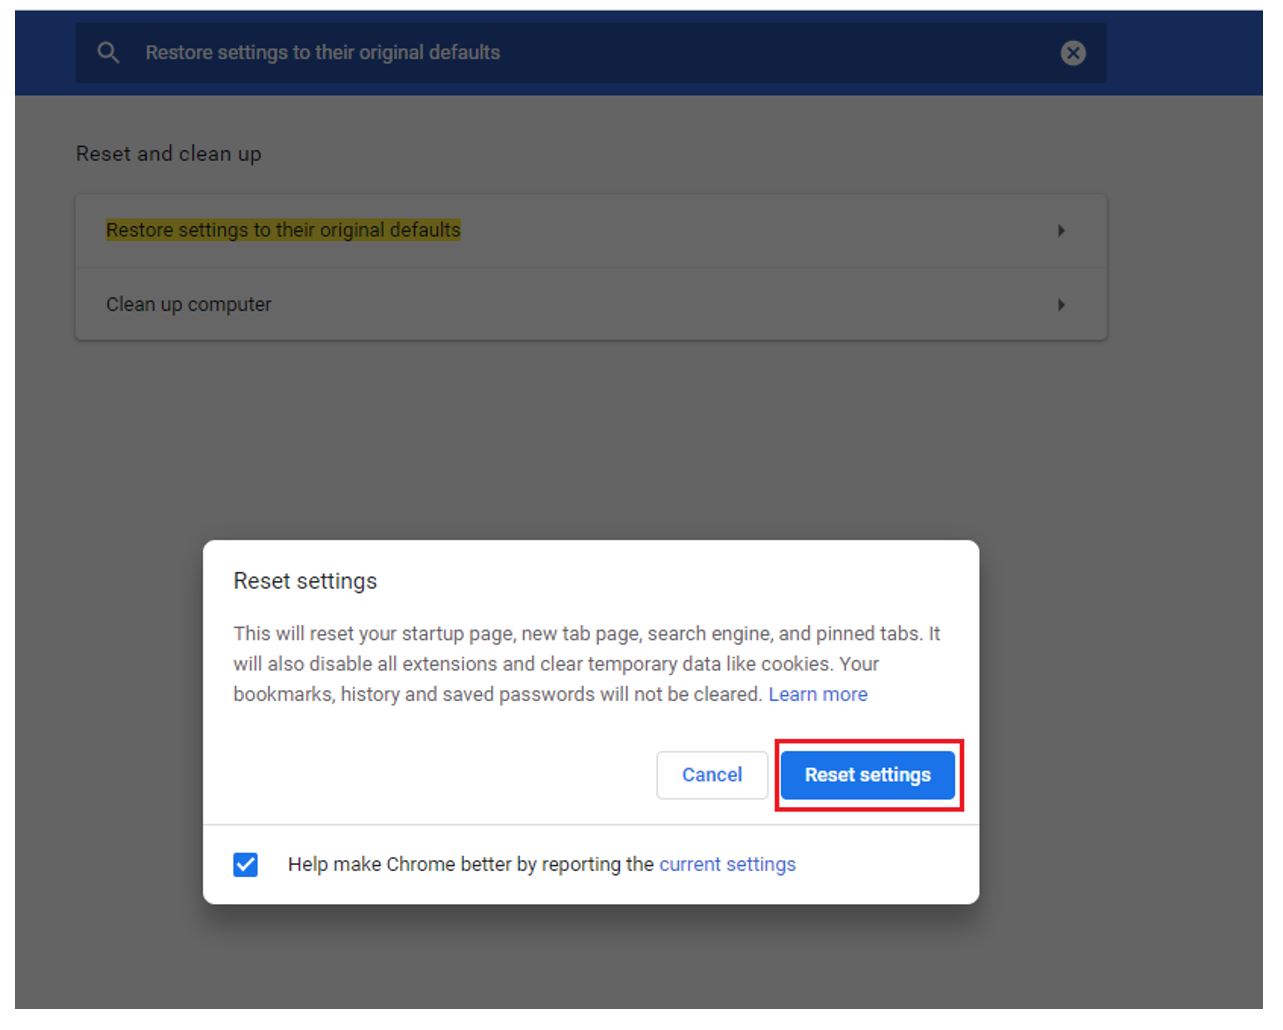
- Under “Advanced” Chrome settings scroll down and select the Reset and clean up option.
- Choose the option of “Reset settings” to set the Google Chrome browser to its defaults option.
- Provide your confirmation that you want to reset your browser.
- Once you confirm wait for the process to get completed.
Once the Reset is completed, close and restart your Chrome browser and see if the error is persisting or fixed.
Fix 5. Update Chrome Browser
Check out if the Google Chrome browser is updated to the latest available version. It is always recommended to check for the latest Google Chrome version and if the updates of Google Chrome is available update it. To update Google Chrome, follow the below-mentioned steps:
- From the top right-hand corner, click on the three dots. Go to the Help section and click on the About Google Chrome option.
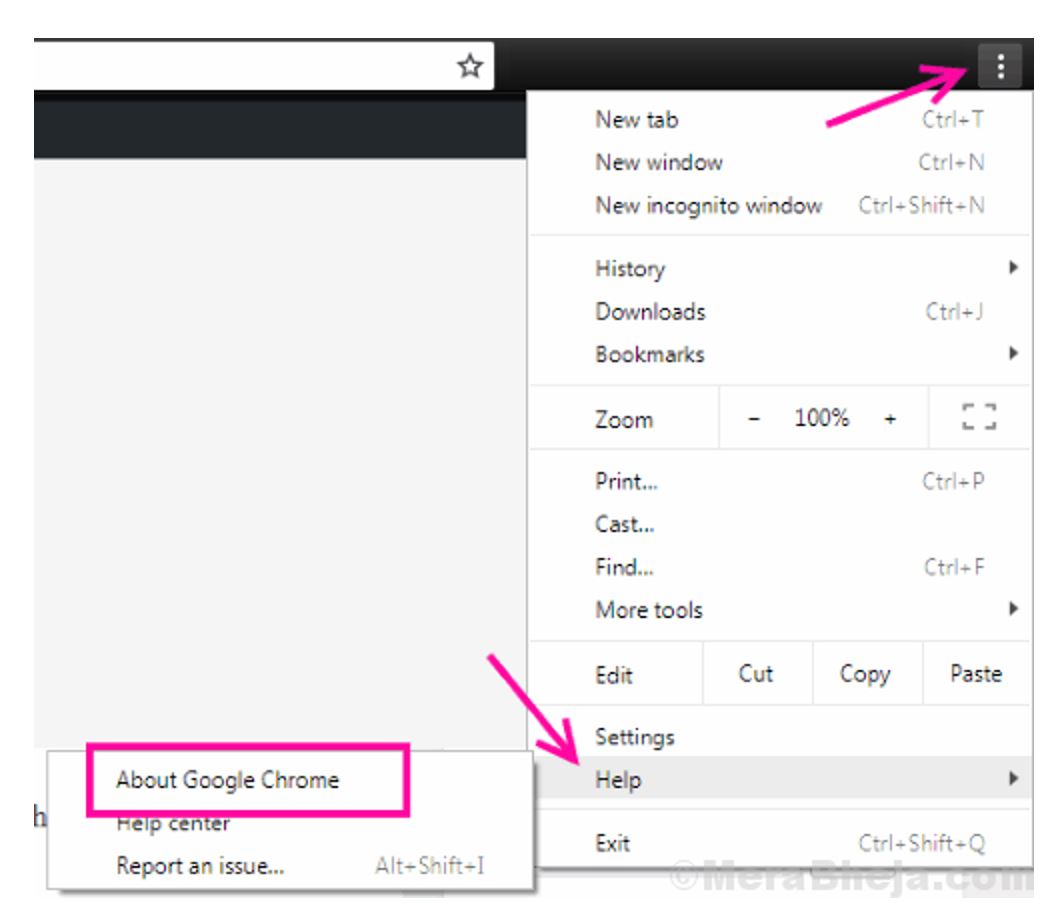
- A new window will appear that will immediately start to look for the latest version. If updates are available, then choose the option to update your browser.
- Initiate the update process and once the process is completed restart your Chrome browser.
Read more articles daily on ErrorCodeGuru.com


Comments are closed.