 NVddmkm.sys error goes by many names. Most users encounter it as nvlddmkm sys bsod while others encounter as video_tdr_failure nvlddmkm.sys windows 8, while others see the nvlddmkm.sys driver_irql_not_less_or_equal error.
NVddmkm.sys is for the Nvidia Graphics card and comes under the Windows Driver class. It is a Kernel-Mode Device Driver and forms an interface between the NVIDIA Graphics card and the Operating System. In this guide, we will review what causes a failure in nvlddmkm.sys file, how to fix it, and in case that doesn’t work, we will guide you on how to reinstall.
Table of Contents
What is nvlddmkm.sys (nvlddmkm sys)
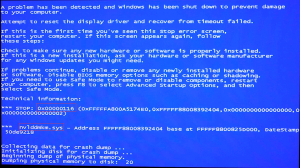
It’s a Video TDR failure (VIDEO_TDR_FAILURE) , where TDR stands for Timeout, detection, and recovery, and controls the Nvidia Graphics card display, driver. It might lead to long delays, and the BSOD or the Blue Screen of Death will appear.
Stop code system service exception nvlddmkm.sys
What Failed nvlddmkm sys?
 It can happen due to driver conflicts, bad voltage, or wrong memory timing. Some other reasons can be like overheating, installation of corrupted drivers, or bad graphics card. Your computer assumes that your graphics card is not responding since there is a low frame rate. And the program that takes control of this is the Timeout, Detection, and Recovery, or the TDR.
It’s a vague and not just one simple bug. Your computer is going to say “Something was not right with your Graphics card, and we are unsure.” Problems can be in power supply, temperature, RAM, or simply the card.
And you will come to know as your monitor might go black for a few seconds, and then be back, with a message from the intro image. It’s fine if you encounter it once, though if it happens again and again then you need to find the other way.
In most of the instances it will occur while you are watching a video or playing a new game, or sometimes something berserk might happen and as your login, you get it after every 10 seconds, and you might even encounter BSOD. The BSOD is the blue screen of Death. Let’s find the solutions now for this.
How Do I Fix nvlddmkm error?
Below are four solutions for the above problem: You might not try all, just try one by one, and see what works for you finally. One will and your problem are going to be solved for sure.
Solution 1: You should completely uninstall the Nvidia Graphics card, and install the latest version.
Solutions 2: You can update the Nvidia Graphics driver.
Solution 3: Look for the Program or Driver’s conflict type of issues.
Solution 4: You can run the chkdsk or perform the memtest checks.
Note: TDR plays a very unique role in stopping the BSODs as it resets the GPU and the driver as the issue arises like long delays. If the issue arises many times in a go, the BSOD occurs.
You need to login to your Windows. And if you cannot then turn on and off your system thrice for performing the hard reboot, and finally kick off in safe mode, and then move up with the below options:
Alternatives To Fixing The Error
1.Nvidia Graphics Driver Clean Install
The graphics card driver might have got corrupted and that results in a VIDEO TDR error, and hence the BSOD. In that case, you can reinstall the driver, and fix the nvlddmkm.sys page fault.
For that:
- Download the Display Driver Uninstaller or the DDU. Now run it as it is installed.
- Now you can select the recommended safe mode or that with Networking. However, Normal mode is fine as well. As you were complete, click on the Launch button.
- Note: the windows password is essential for Windows users. And Pin becomes useless in safe mode. Quit if you are not up with these.
- Select The recommended option “Clean and Restart”.
- You will find that your computer starts on its own as your display graphics card driver is removed or uninstalled.
- Now via keyboard, tap on the Windows key and X at one time. Now select the Device Manager.
- Now select the Action and now scan for various changes in the hardware.
- Now your computer scan for all the updates related to the display drivers that are available automatically for you. Just be patient until this finishes up.
2.Rename and copy the file nvlddmkm.sys
Download and install the latest Nvidia drivers on your PC. Now go to the folder:
C:\Windows\System32\Drivers
Find the nvlddmkm.sys file there, and rename it to nvlddmkm.sys.old.
Now go to the Nvidia directory (usually C: \ Nvidia), and find the nvlddmkm.sy_ File there. Copy this file to your desktop (or to the desktop directory on the disk).
Now click on the “Start” button, enter cmd in the search bar, and press enter.
In the command window that opens, enter:
Chdir Desktop
and press enter.
Next enter:
Expand.exe nvlddmkm.sy_nvlddmkm.sys
and again click on enter.
After that, copy the nvlddmkm.sys file from your desktop to:
C:\Windows\System32\Drivers
Reboot your PC.
3.You can update the Nvidia Graphics driver
In case you find reinstallation of the driver does not resolve the nvlddmkm.sys BSOD nvlddmkm.sys page fault, it must then be that you have chosen the wrong driver all in all. You can get out of this deadlock in two manners, the first one is to get the driver manually and the second method is automatic.
Manual Update: It’s possible to update the Nvidia driver manually, but you need to visit the manufacturer’s site for download of the correct video card driver. Search always for the correct match, and the latest version. However, that must be compatible with your windows 10 variant. Sometimes you need to rollback driver as well.
Automatic Updates
If you find a shortage of time, patience or you lack the skills for updating the driver on your own, then you can do it automatically with the help of software known as Driver Easy.
It will automatically find out your system and find the best driver for your monitor and your Nvidia card, as well as the Windows 10 variant installed on your computer. It will then download it and install it without any error.
How To Update?
- Get the Driver Easy from the internet and install it.
- Run it and click Scan now button. The software will scan your computer and find the driver that is facing a problem.
- Now tap on the UPDATE button which is placed just after the flagged NVIDIA device for downloading automatically the correct driver version, and then you can install it manually. This is possible through the free version.
- However, if you have the pro version then you can click on the Update All for automatically downloading and getting installed the exact version of each correct driver, and missing or are not updated on your PC. However, for this, you will need the pro version that comes with the complete support as well as a guarantee of 30 days money back if it does not work.
There can be two more issues that might arise, and they are Programs or the Drivers conflict issue, and you must check for it as well. In case you just installed some new drivers or programs on the system, you need to remove them, or get them upgraded to the most recent version.
It has been found that these drivers’ conflict with the webcams from Logitech and various other integrated options, and that can create a problem. What you need to do is to get rid of these webcams and get uninstalled its drivers, for checking if the nvlddmkm.sys latency is resolved.
It has also been found that the BSOD errors are generally because of the corrupted RAM or hard drive. You need to perform some tests for checking this issue. You can opt for the disk check to check whether the problem is due to the hard drive.
- Run the command prompt in admin mode. For this tap on Windows Key and X at once, and select to run cmd as Admin. And as prompted click yes for administrator permission.
- Now in the cmd, type Chkdsk /E C: However, if the windows set up file is in some other drive, then replace C: with that disk letter. Now type Y when prompted. The computer will restart and do the disk checkup. Wait for the checkup to be completed.
You can run the Memory test as well. This will check whether the problem is due to the RAM or not. For this invoke the Run command. Now write there mdsched.exe and enter. Your computer will show you restart now and check for issues option, for checking the memory card status. Check now or later, if you have some pending work. You will now see the page that shows the check progress and various count of passes that it runs on the memory.
Solution #4 We check memory modules
In some cases, the cause of dysfunction nvlddmkm.sys is the unstable operation of the PC memory strip.
If you have several strips connected, then try alternately using only one, and see if there will be an error.
If the error disappears, it means that any of the currently unconnected strips is to blame.
You can also use special tools for memory testing, the ” Memtest86 ” level.
Solution #5 Deactivating system overclocking
The cause of the error may also be overheating of the system (in particular, due to its artificial overclocking). Disable such overclocking in BIOS (if available), and deactivate programs for such overclocking.
Solution # 6 We engage a more powerful power supply
Another effective solution to nvlddmkm.sys will be to activate a more powerful power supply in the system. A number of users considered in the article an error occurred due to an insufficient power supply, so replacing it with a powerful alternative eliminated the problem.
Solution # 7. We use the functionality of the utility CHKDSK
Another option for solving dysfunction is to check the hard drive for errors. To do this, you must use the functionality of the CHKDSK utility. Run a command prompt and enter there: Chkdsk / f c: and press enter. Wait until the verification procedure is complete.
Nvlddmkm.sys Latency
If no error is seen here, it’s certain that your memory card is a good one, and not creating an issue that results in nvlddmkm.sys latency. If the RAM card is not good or the hard drive, replace them immediately.
You might also try changing the power supply to high performance and see if it works as new driver cards require more memory sometimes, and that can create a problem. However, they are then provided with external power supply as well. You need to hence, set the power option to high performance only, and the issue will be sorted out if its due to the power supply. You can try changing the theme as well.
You can opt for Windows update as well, and check if that works. The problem might arise due to overheating as well. And hence, you should always opt for a better cooling system.
A temperature of around 25 degrees must be maintained if possible always, though your PC will be fine till 40 degrees definitely, and there is a good margin for low temperatures as well, however, there should not be any moisture issue that might be a case if it is humid, You can downclock the video clock speeds as well as the RAM speed and check if that works. Sometimes, the voltages need to be adjusted as well.
Well, something out of the above will certainly work, and you will find your nvlddmkm.sys error has been removed, and your computer is working fine again.
[…] Check Another Blue Screen Here. […]