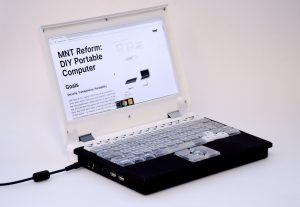
How to build your own laptop?
For many, self-assembly of the system unit has become something more than a financial benefit.
The individual approach allows you to achieve not only uniqueness but more importantly, focus on the details that are important to you.
In this computer, everything is selected and configured, based on your individual preferences, ideas, tasks, and specifics.
If everything is quite clear with the system unit, then what about the laptop? Is it possible to assemble a laptop yourself?
Undoubtedly, the main difference between a laptop and a PC lies in its more compact dimensions, the presence of built-in accompanying devices, such as a display, keyboard, trackpad mouse and other accessories.
Components that make up the foundation of any computer remain the same regardless of size and form factor. Regardless, building your own laptop from scratch is better than throwing your computer away.
Table of Contents
How To Build Your Own Laptop From Scratch
Assembling a laptop from the components, the easiest option of all. Some parts have the required size, which facilitates the installation procedure in the case.
- Main components
- Motherboard
It may sound strange, but let’s start with the choice of a finished laptop. No, this is not nonsense, just read on and understand everything.
First, let’s study the characteristics, paying special attention to the processor and video card.
As a rule, the same model can have several modifications, that is, it can have differences that can be either insignificant or quite significant.
The most common are different processors, video cards, displays, sizes. If possible, we study all modifications of the laptop and their differences.
Only after this step is it possible to understand which processors and video chips it is possible to install on the motherboard.
As you can see in the table, the laptop comes with processors from different manufacturers.
Different characteristics and socket “processor socket,” the choice of which depends on the choice of board.
It is impossible to insert a processor from 1 manufacturer into slot 2 and vice versa, due to different technological solutions.
Video card
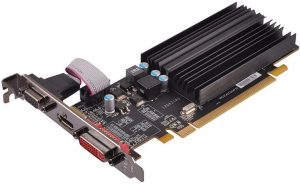 Next, look for the line with the name of the video card. It will look the same way.
Having decided on the choice, it remains to find and purchase a motherboard based on the selected processor, its socket, video chip.
To find out the number, the model will use the Internet. Enter the name of the laptop + motherboard.
After that we look for the number, model, check if the processor socket and the video chip match. Similarly, we find the number, processor model.
Usually, it is sold separately from the board, in some cases this is possible with a video chip, but much less often. If everything is found and fits, then the first, difficult step is completed.
RAM
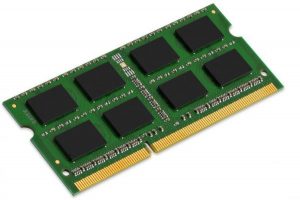 RAM is selected based on the supported standard, frequency and number of GB processor.
For example, DDR3 or 4 up to 16GB support is claimed.
Therefore, we can install no more than 16GB. Laptops, like most portable devices, use reduced SODIMM form factor memory.
Their manufacturer has almost no value, so it’s worth choosing based on cost.
You should not take the most expensive or, on the contrary, cheap modules, it is better to take something in between.
First of all, you need to know what memory frequency the processor itself supports; the choice of slats will depend on it. Suppose the frequency is 1600 MHz.
If it turns out to be slightly higher, for example, 1866, then it will work as 1600 MHz. The extra 266 MHz will not be used, if the opposite is lower, for example, 1333 MHz, it will work as 1333 MHz, that is, at its frequency.
In both cases, the memory will work. In the first embodiment, it will not be able to use its full potential, and in the second it will not be possible to get the maximum performance that the manufacturer laid.
But the differences will be insignificant and noticeable only in professional applications, in which the increase will sometimes be from 1 to 5%.
Find out the frequency of the memory strips themselves; just look at their characteristics. It is also worth seeing how many slots there are for RAM on the motherboard.
If 16GB support is declared, and there are two slots, then 2 memory bars of 8GB or less will be required, depending on the desired number. You can insert 8GB with one bar for further expansion.
You should never look at the characteristics in only one place, for example, on the manufacturer’s website.
Yes, we will definitely learn the main ones that are necessary when choosing in the first steps, but minor ones, such as the memory frequency.
May not be indicated; therefore we will use other sources to search for additional data.
Cooling System
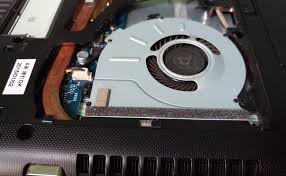 The cooling system is best used specifically designed for this motherboard.
Usually, it consists of a radiator and heat pipes on a central processing unit and a hp.
It is possible to use another variant of cooling, but the main thing is that the mounting holes coincide; the system copes with the removal and dissipation of the heat produced.
HDD
HDD should be 2.5 inches. Capacity and manufacturer are selected from individual preferences.
Display, matrix
Matrix, for the display, you can choose any, as long as the connector on the board is the same.
Any universal matrix that can be purchased separately, or with a laptop lid, will work, but in this case, it should be ensured that the mounting holes on the case match.
The main parameters to which attention should be paid is displayed production technology. There are two main ones – these are TN and IPS.
In short, TN is the oldest production process, with the worst color rendering.
The quality of the picture depends on the angle at which to look at it; therefore, the minimum distortion can be obtained if you look directly, without any special deviations of the head relative to the center.
IPS practically does not depend and is distorted from the viewing angle, the color rendition is many times better, but it is more expensive.
This type of matrix is used in laptops, monitors, televisions, and so on, of the middle and even higher segment.
In professional use, usually another technology is used, but this is a completely different story.
The only problem that may be encountered is if the matrix refuses to work, which happens quite rarely.
Some manufacturers do this by deliberately checking through the BIOS, but universal matrices are not, then universal, which are suitable in 90% of cases.
If you are afraid of incompatibility, you can also buy a matrix for the laptop from which the motherboard was taken.
Housing
The case should not be less than the one used for the laptop from which the charge is taken.
Not less than the selected diagonal of the display, and it is desirable, but not necessary, that the power button is located on the same side.
For example, the initial size was 15 inches, and you decided to put the display 17, then you need a case for 17 inches. If you do the opposite, the board may not fit inside the case.
Rest
The keyboard and trackpad are usually standard connectors for connecting, fit any that fit into the case.
The battery can be purchased the same as the one from the donor of the board, but any analogue will work, it will work a little, not worse, and perhaps even better if the battery capacity is greater.
For reliability, we will look for a battery from a donor and see what voltage and capacity are written, after which we will acquire with a similar voltage, the capacity can be any: the more, the better for battery life.
The charger is selected based on the board and battery. It is possible to start a laptop without a battery; it is enough to have a charger with a power supply.
Optional components
To date, disco input is not a standard or mandatory component, as its popularity is gradually disappearing from year to year. There are two main types of SATA and IDE connectivity.
If the motherboard is newer than 2007-2008, then SATA is used. Another difference is the thickness of 7mm or 9mm. By 7mm, a seal is usually included if it turns out that 9 is required.
Wifi and Bluetooth
These communication interfaces can be already integrated into the board if any of them is missing and you need it, and then the problem can be solved with USB adapters from any manufacturer.
Conclusions and Caution
In this article, for informational purposes, the theoretical part of assembling a laptop of components has been considered.
This material is not a detailed, or an example of the assembly. Any attempts to implement the above, are done at your own risk, excluding any liability of the author.
The purpose of the material is to tell that it is theoretically possible to independently assemble not only the system unit but also a laptop.
See Laptop Charger Problem Here.