 Audiodg.exe is the audio component for Windows (Vista, 7, 8 and 10). Inside your Windows Task Manager, it is represented as an ‘Audio Device Graph Isolation’.
The process enables your PC audio driver to run under a separate session as the user is currently logged in and is the audio engine for Windows.
This prevents other software applications from modifying or changing and content or plug-in enhancements.
It is a part of the Windows file system. It is not responsible for causing errors.[1].
In other cases, it is noted as a virus, trojan or worm
The main reason behind that is the spyware applications or different antivirus programs scans the original file as a virus.[2] Originally it was called the process DeviceGraph.exe.
For different reasons that are no longer relevant people though that they need to limit their binary numbers.
So after it was named as audiodg (Audio Device Graph), people thought it was more redundant but it was settled. Occasionally, you may experience errors with your audio output such as no audio output device is installed too where a red X appears on your speaker symbol.
[3] There are many fixes present for the audiodg.exe but we are going to discuss the most common ones.
Table of Contents
Application Error audiodg.exe
The audiodg.exe is a part of the Windows file system, but sometimes spyware, virus or trojan gets into the system replacing the original file and causes the problems. There are many application errors that are caused by audiodg.exe.
Following are the common error messages which can occur more often:
- Poor performance of “stuttering” while playing movies on Media Player or VLC Player.
- Constant “beeping” sounds while performing regular tasks in Vista of Windows 7.
- High CPU usage or memory leakage, sometimes peaking at 100% CPU and causing lockups.
- Can cause all audio/sound/speakers to stop working after a few minutes. Even after reboot.[1]
- Audiodg.exe crash on systems after some time.
High Disk Usage on audiodg.exe
There are many reasons for high disk usage or CPU usage. It could be through heavy processing, rendering, etc.
In the case of audiodg.exe, many people have noted high disk usage in the task manager or even the lagging in the system due to the high consumption of resources.
The reason behind that could be the audio process by the original audiodg.exe or there is some virus or spyware which is named audiodg.exe.
Another possibility is that there are certain audio effects when enabled push this process or the sound driver is not updated or the drivers which are needed by the gaming devices might not be updated.
[4] There are many ways to fix the problem, the following are the common fixes for the high disk usage on hxtsr.exe.
- Run a full virus scan, as we know that the original file is saved in the “C:\Windows\System32”. So, we can also check there.
- Update the audio driver, by going to the devices and drivers and update the audio driver.
- You can also update the drivers through software called Driver Easy.[5]
- Update your game or concerned software.
- Disable audio effects.
- Disable volume adjustments.
- Change the audio sample rate.[4, p.]
How to Disable audiodg.exe
Sometimes due to high audio usage, the CPU processing increases. There are many ways to disable audiodg.exe.
Some are to disable it temporary and some are to disable it completely.
Following is the step by step guide on how to disable/remove it completely from the system:
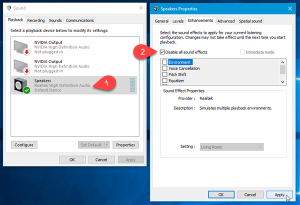
- The first way to disable the audiodg.exe is by disabling the audio enhancements.
- Right click on the Audio icon in the system tray.
- Select Playback devices.
- Sound Properties box will open.
- Your speakers will have a green check-mark.
- Select it and click on the properties button.
- After opening the properties window, switch to the Enhancements tab.
- Now make a tick in Disable all sound effects checkbox and save your change.[6]
Step by Step Guide to Resolve the audiodg.exe error
Many solutions/fixes are available which help resolve the errors caused by audiodg.exe. Following are the most common fixes which are used to resolve this issue.
Fix 1:
- Open the Sounds window. You can do this by right-clicking on the Speaker icon on your taskbar or you can go to Control Panel and click on the Sound applet.
- On the Playback tab, click on the icon that has a green check mark. Then, below it, click on Properties. That should open another window.
- Go to the Enhancements tab and you’ll see a list of enhancements supported by the device.
- Try ticking the box on Disable all enhancements and see if it resolves the problem. Go to the Performance tab on your Task Manager and check how your audiodg.exe file is using your CPU.[7]
Fix 2:
- Go to the Device Manager. You can press the Search icon on the taskbar on your Windows 10 computer and enter Device Manager or find it on Control Panel.
- On the Device Manager window, find the section on Sounds, video, and game controllers, and click on the drop-down arrow. You’ll find a list of drivers including perhaps Realtek or Conexant Smart Audio driver.
- Right click on the audio driver and choose Uninstall.
- Restart your device for Windows to reinstall the driver.
If this didn’t work, update the generic audio driver that came with Windows.
Follow these steps:
- In Device Manager under Sounds, video, and game controllers, right click on your audio driver.
- Choose Update driver.
- Click “Browse my computer for driver software”, and then choose “Let me pick from a list of device drivers on my computer”.
- Select High Definition Audio Device and follow the instructions in the dialog box to install it.
- Please reset your computer if advised to do so.[7]
Fix 3:
- If you run into this issue when using Skype.
- Uninstall the software and install a new version.
Some Skype users have reported that this worked for them. Maybe it would work for you too.[5]
You can also adjust the audio sample rate if none of these fixes work for you. It can be done in the device manager in audio devices.
References
[1] “Fix Audiodg.exe High CPU Usage in Windows 7 | Windows EXE Errors.” [Online]. Available: http://windows-exe-errors.com/fix-audiodg-exe-high-cpu-usage-in-windows-7/. [Accessed: 19-Feb-2019].
[2] “audiodg.exe Windows process – What is it?” [Online]. Available: https://www.neuber.com/taskmanager/process/audiodg.exe.html. [Accessed: 19-Feb-2019].
[…] time provides for individual settings. When using other people’s devices, the user has to re-adjust the usual parameters for a comfortable […]